Just searching for the phrase "basket weave" in your favorite search engine will return a number results for various materials. From stitching to tiling you will find that this pattern is used for a variety of creative projects. In this article though, we are going to talk about variations of the basket weave pattern as it applies to pavers. Pavers have grown in popularity and are used for patios, walkways, and even driveways.
The basket weave paver pattern is a versatile and flexible pattern that can be arranged in a number of variations. Because the name references the way the pavers appear to weave behind and in front of other pavers, the look is achieved in different ways. Let's now take a look at various basket weave paver patterns. We'll start with the basics first and then look at some variations.
Basic Basket Weave
You will find that the "basic" basket weave pattern is often shown using an alternating of pairs of pavers (or bricks). Because of the way that a basket weave pattern in its basic form is arranged, the pavers used for a "basic" basket weave have a length being twice that of their width. So, when beginning a basic basket weave paver pattern, the first 8 pavers would be arranged this way:
Since the pattern is constructed with alternating
pairs of pavers, this basic form of the basket weave is sometimes referred to as 2:2 basket weave. You will also see it referred to as a "double" basket weave. The completed pattern looks like the following.
We will get into this more later on. First though, let's look at one simple way to change this basic variation of the basket weave.
45 Degree Basket Weave
A very easy way to vary the basic basket weave is to construct it on a 45 degree angle. Because it creates a different visual feel to the project design. Notice what
This Old House says about angling a basket weave pattern 45°.
Turning the squares of a basket weave 45 degrees adds visual depth and will round a curve nicely but requires a lot of custom cutting along the perimeter.
Starting a 45° basket weave pattern looks very much like our previous variant, except it is on a 45 degree angle. The first 8 pavers in place look like the following.
As you can see from the image above, angling the pattern just 45° adds a bit of visual interest to the already interesting basket weave. Starting your pattern in the center of the area you are paving can yield good results, although it is not a requirement.
Alternate Basket Weave Patterns
In each of the cases above, we used 2 pavers side-by-side oriented in one direction and two pavers side-by-side oriented in the opposite direction. However, there are many possible basket weave variations you can achieve by simply changing up the stone size and the number of stones used for a sequence. Additionally, any basket weave pattern can be rotated to 45° to get a change up on the variant. Let's look at some.
1:2 Basket Weave
Changing the number of vertical pavers in each sequence to 1 instead of the 2 that are used in the basic basket weave gives you a 1:2 basket weave variation. The beginning of this variation looks like the following image representation after the first 3 three pavers are in place.
Notice the similarity to the basic 2 by 2 basket weave we mentioned first. The only difference is that instead of placing 2 pavers in the vertical position, there is only one. The horizontal pavers remained doubled up to complete the pattern sequence. Incidentally, if you were to use only 1 vertical and one horizontal paver and repeat the sequence you would end up with a 1:1
herringbone paver pattern. The 1:2 basket weave pattern looks like the following when complete.
Rotating the 1:2 basket weave pattern 45° results in a visually interesting paver pattern that is constructed the same way as the previous version. The 1:2 45° basket weave pattern when completed looks like so.
1:3 Basket Weave Paver Pattern
The 1:3 basket weave pattern is another variant that echos the sequence we saw with the basic pattern at the beginning. However, this paver pattern is constructed using pavers that are three times as long as they are wide. So, a variety of pavers can be used to construct this basket weave variant. Here are some that could be used if desired.
3" x 9"
4" x 12"
5" x 15"
6" x 18"
To begin the 1:3 basket weave, you place one paver oriented with the short side facing you. Then, place the next three pavers side-by-side such that the short sides of them are against the long side of the first paver. Here is a visual representation of what the beginning of this basket weave variant looks like if you are looking down at it.
Repeating this sequence in all directions yields a woven pattern which resembles the the following image that represents the 1:3 basket weave variation.
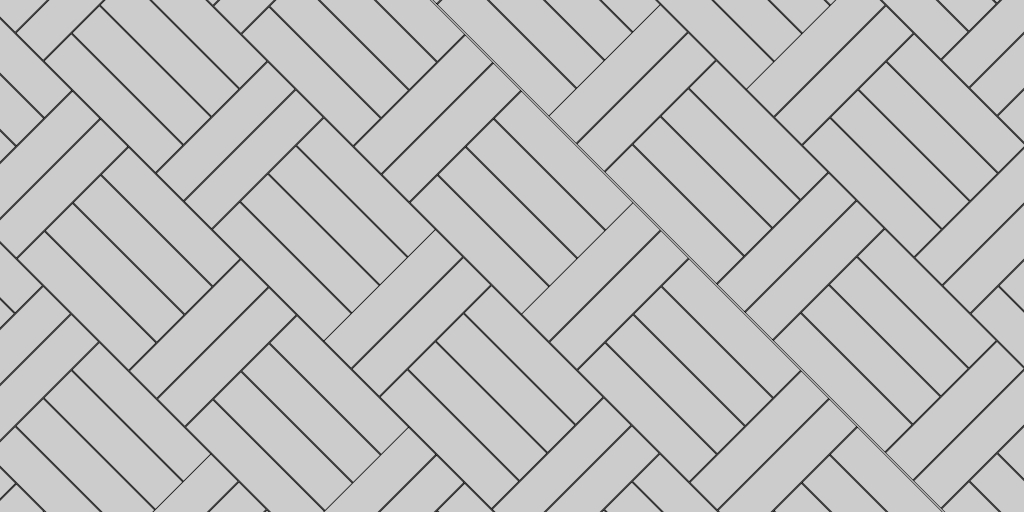
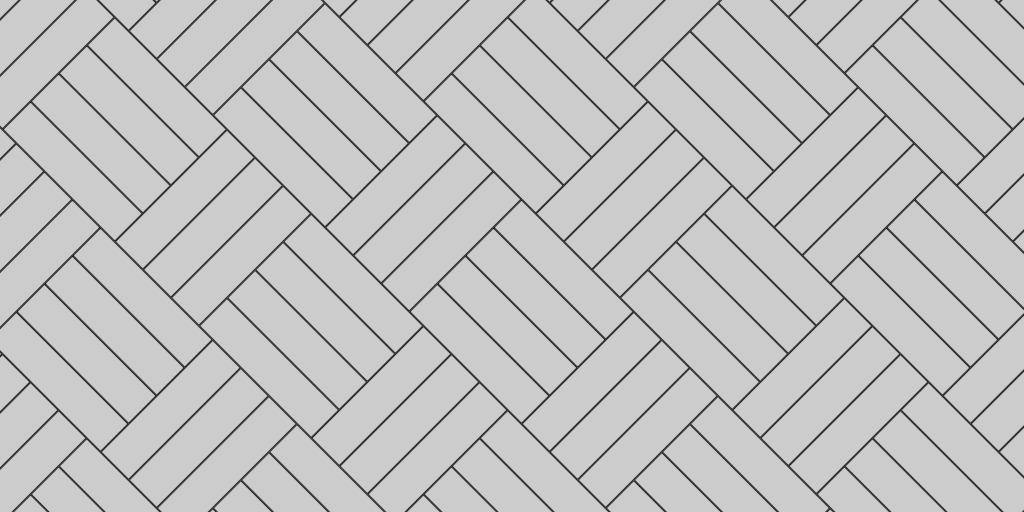
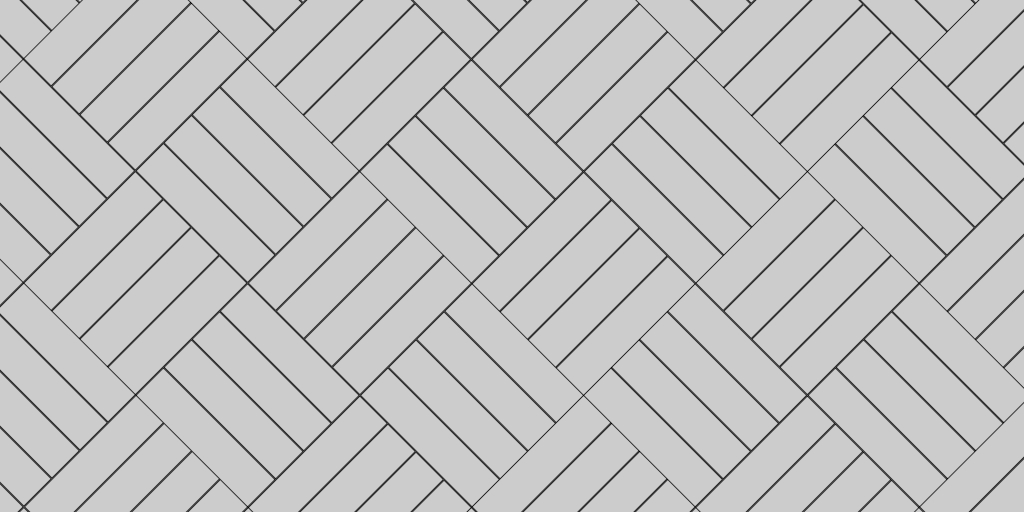
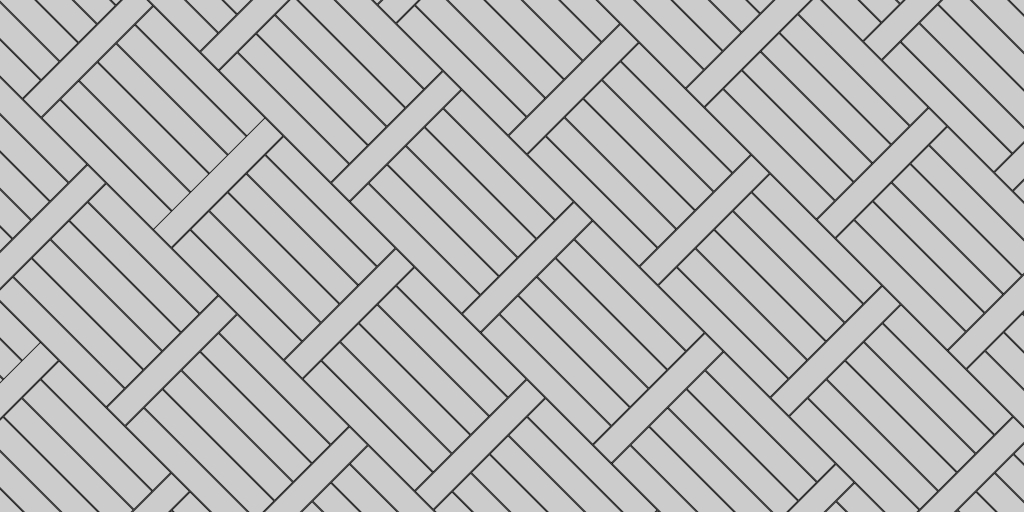
For a bit of an adjusted look using the 1:3 basket weave pattern, you can construct the the pattern on a 45° angle and you will come up with a pattern that looks similar to the following.
Thus, with a simple adjustment of the pavers from the beginning, you can create a look that has added visual depth and a bit of a different texture.
2:3 Basket Weave Paver Pattern
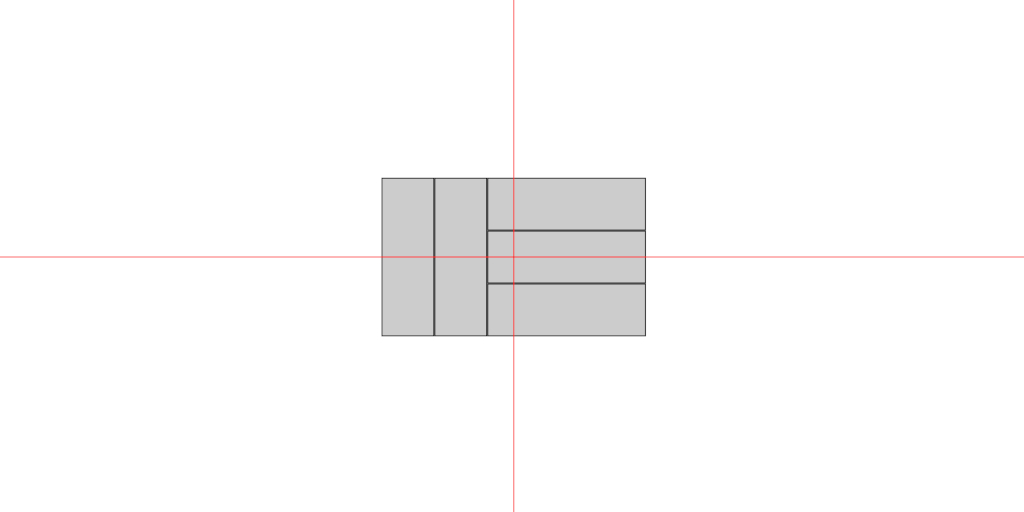
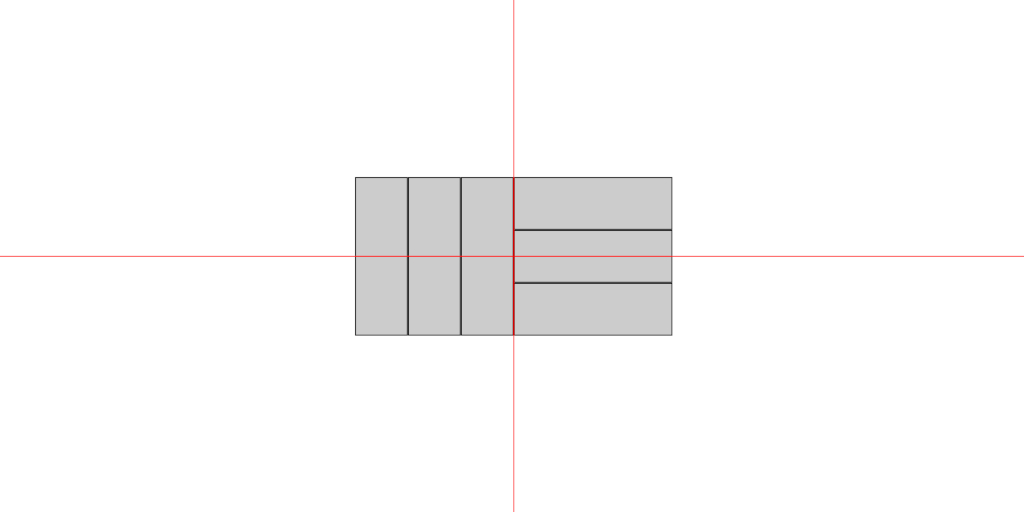
Another variation of the basket weave pattern that you can construct using pavers that are three times longer than they are wide is the 2:3 basket weave. Starting in the same way as the 1:3, place your first paver. However instead of placing one paver oriented with the short side facing you, you place two of them. Then, place three pavers oriented the other direction like we described in the 1:3 variation. After placing the pavers as described, you will see an arrangement similar to the following.
Continuing the arrangement and repeating outward from the starting point to fill the space in which the pattern is to be laid, yields the following look.
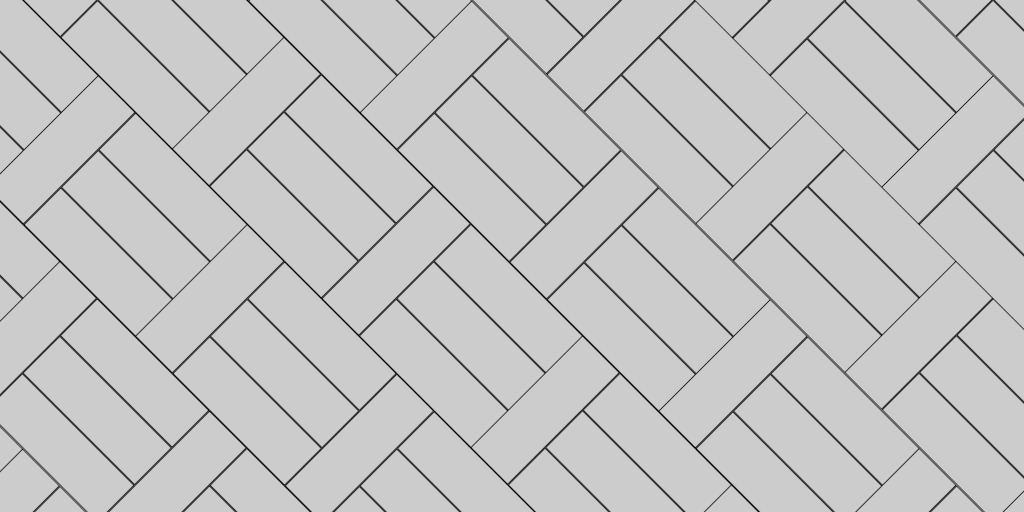
Rotating the pattern in either direction by 45° will afford you the opportunity to create yet another pattern with the same paver sequence that resembles this example.
The 2:3 basket weave paver pattern is merely one of many variations that can be constructed using a paver that is three times as long as it is wide. Let's continue with our patterns.
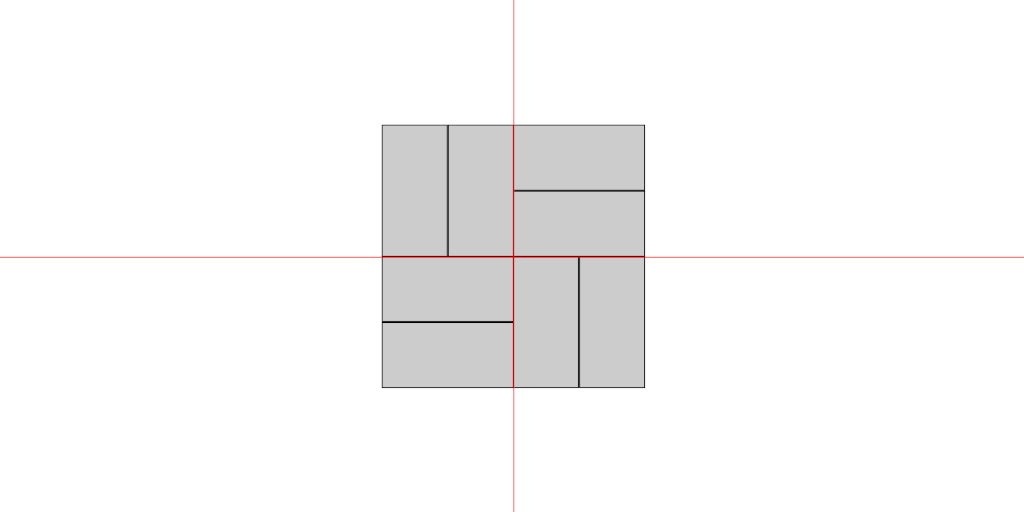
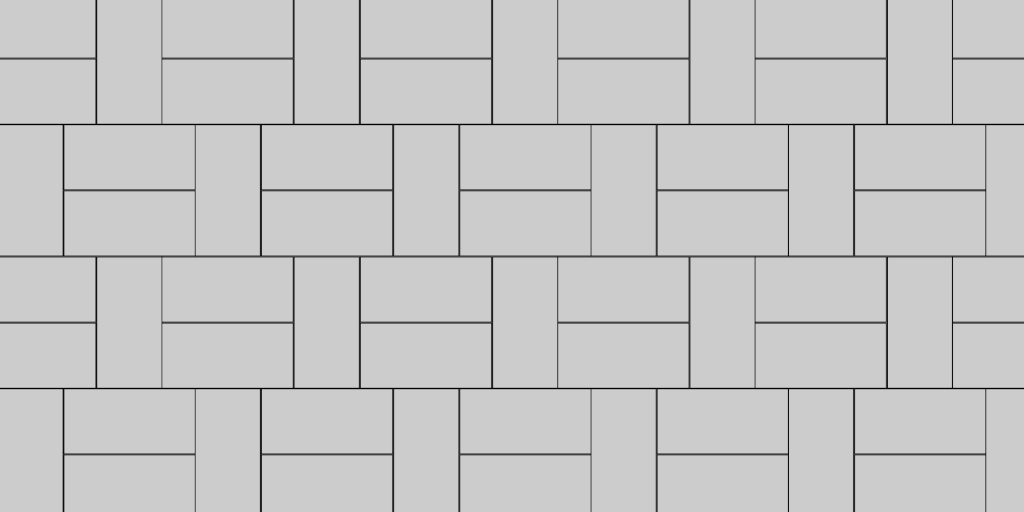
3:3 Basket Weave Paver Pattern
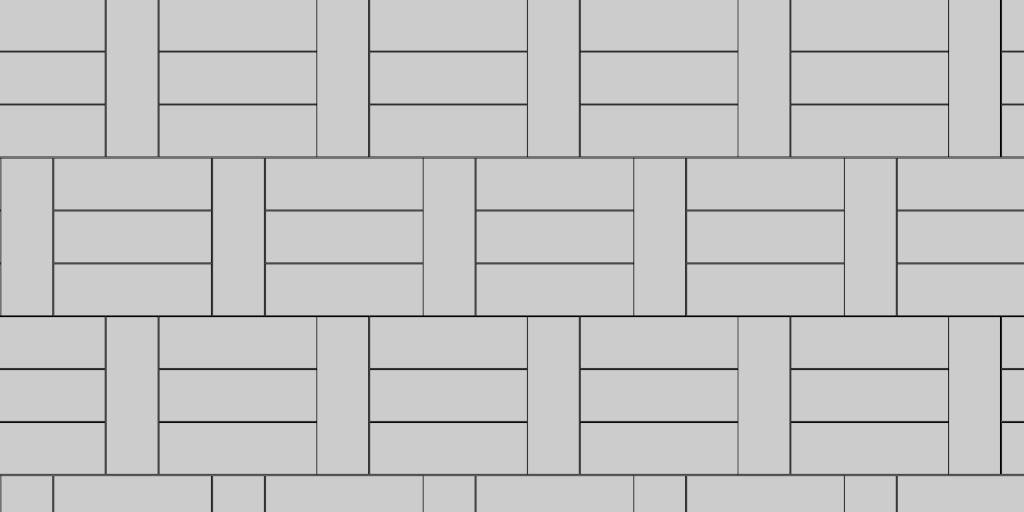
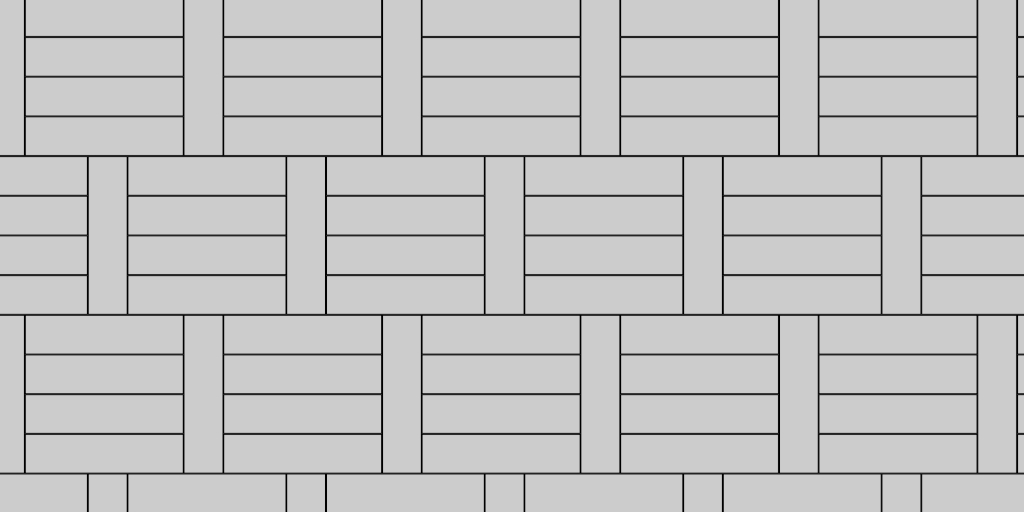
When you have a large amount of pavers and they are all the same size, if the dimensions of the pavers are such that they are three times as long as they are wide, you can create a 3:3 basket weave paver pattern. Designing your walkway, patio, driveway, or other surface using this paver pattern is relatively simple. Beginning from your starting point, You line up three pavers in one direction and the next three pavers you line up in the other direction. So, your pattern will begin looking like the representation in the image below after your first six pavers are in place.
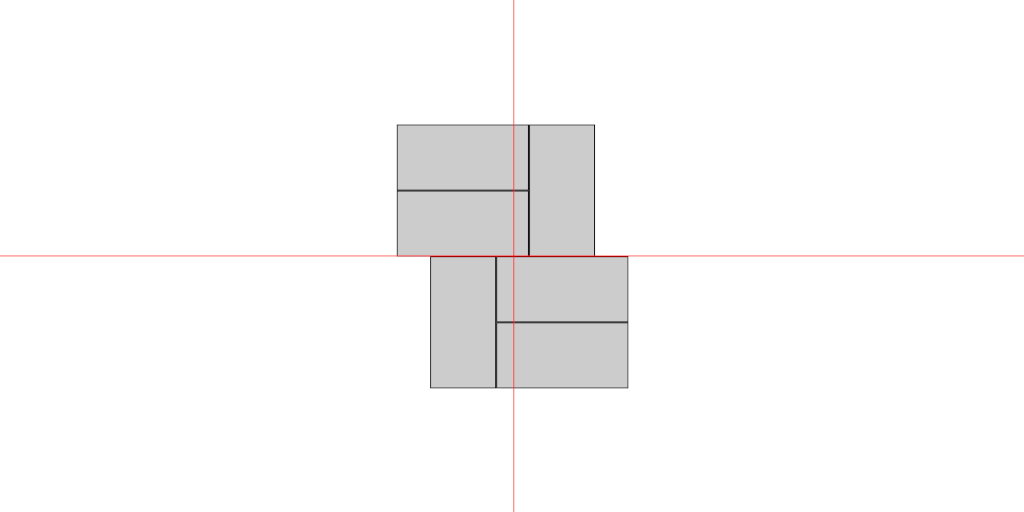
Continue repeating the sequence you used to begin the pattern until your first row is complete. When you begin your second row of pavers, alternate the direction in which you are placing your groups of three. For example, your second row of pavers may look similar to the one in this image.
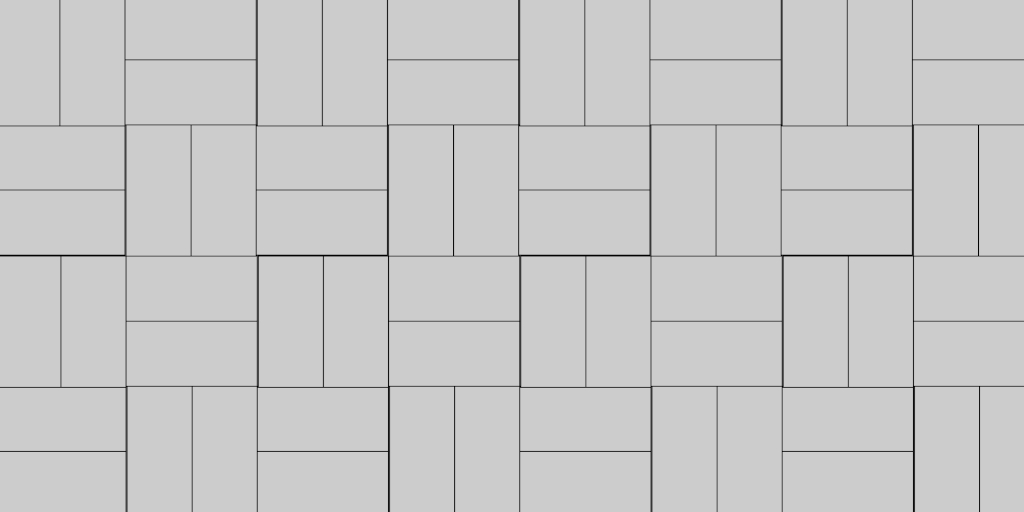
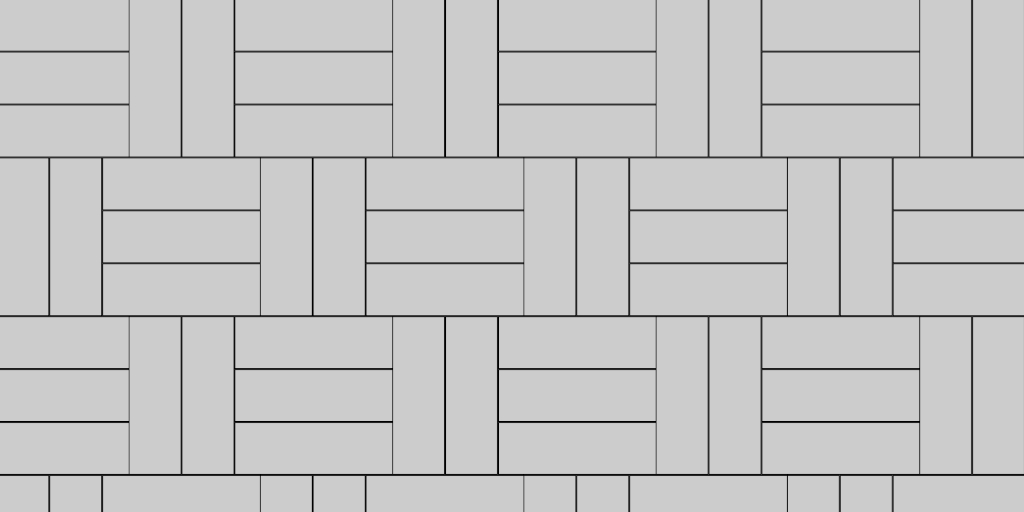
Continue with your rows, alternating each new row until you have filled the space you are paving. Once you have completed the area, your pattern should look something like the pattern in the image below.
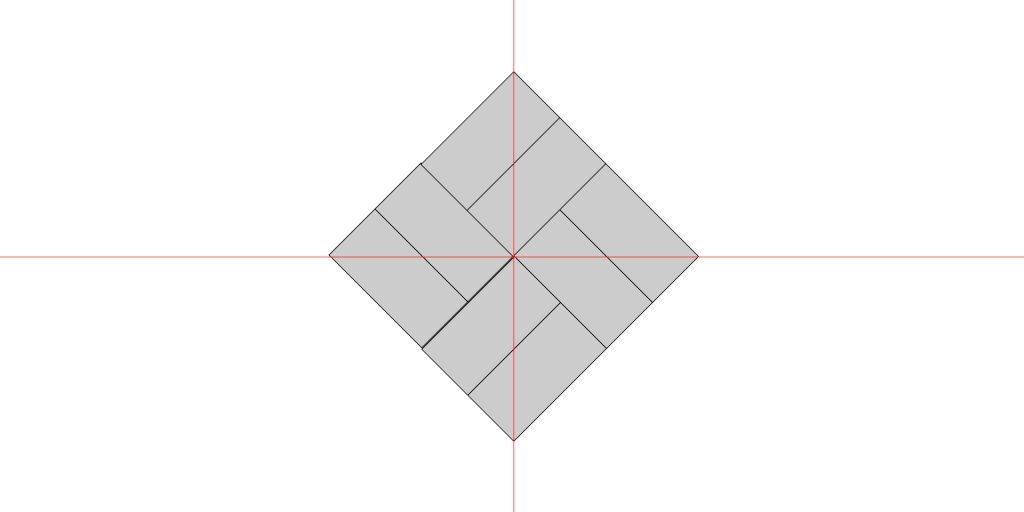
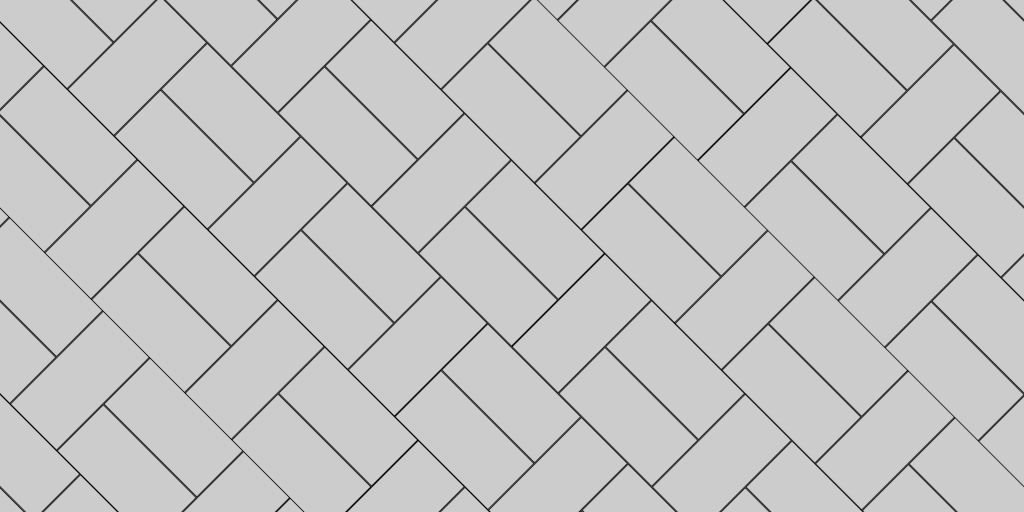
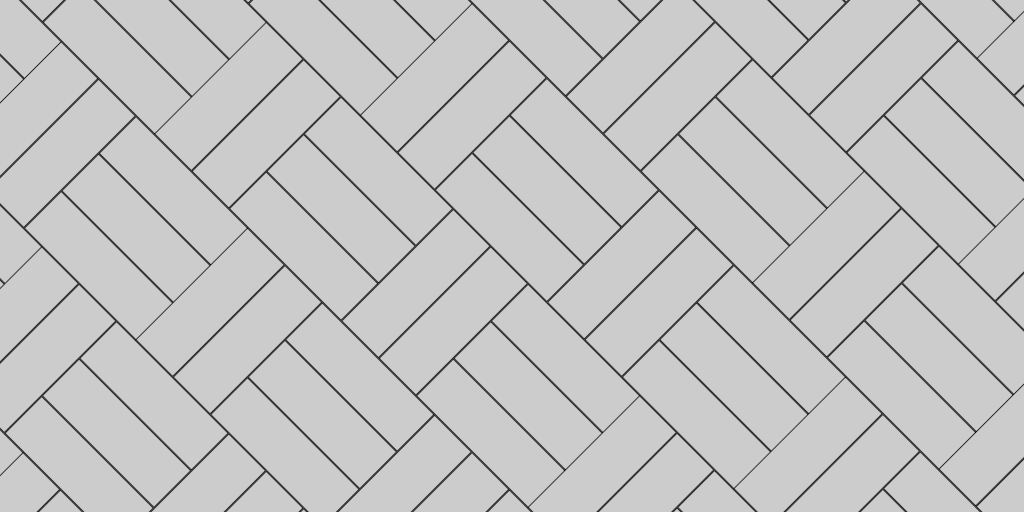
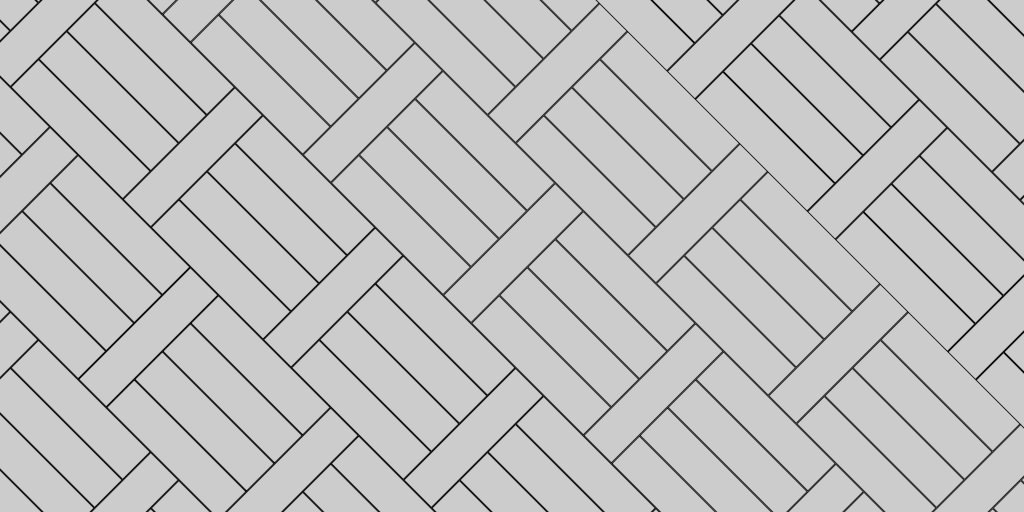
In addition to the standard 3:3 basket weave orientation that we just mentioned, you can arrange your pavers at a 45 degree angle and produce a 3:3 45° basket weave variation of the pattern as well. Doing so would produce a pattern resembling the one in the image below.
So, given pavers that have a length that is three times that of their width, you can create the 3 by 3 basket weave paver pattern in its standard orientation, or you can create it on the 45 degree angle.
1:4 Basket Weave Paver Pattern
Some of the options for concrete paver sizes are such that the length of the paver is exactly four times the length of the paver's width. When you have pavers with this proportion, you are equipped to create any of the patterns that we refer to as the "by 4 basket weave" patterns. So, any of the following sizes of pavers can be used to create the "by 4 basket weave" patterns that we will look at.
3" x 12"
4" x 16"
6" x 24"
The first paver pattern that we will mention in this section is the 1:4 basket weave pattern. Creating this pattern is relatively straight forward. You begin by placing on paver so that the short side of the pave is facing you. Then, you place four pavers to the right of the first with each of their short sides against the long side of the first paver. So, after placing your first five pavers, you should have a sequence that looks like the following.
Continuing that sequence of pavers across the entire span of the area results in a completed first row. You may need to cut the paver(s) in the end position depending on the measurement of the area you are paving. When you begin the second row, offset the pattern so that the paver with the short side facing you is in the center of the four pavers with the long side facing you in the first row. It sounds complicated when it is written out in words, so here is an image to show you the alignment.
Again, you may need to cut the pavers on each of the end(s) of the row depending on the size of the area you are paving. As you continue to fill in the area row by row, keep alternating the offset for each new row you start. Once the area is completely filled in, you should have a pattern that looks like the representation in the image below.
Looking at the completed pattern, it is easy to see why the pattern is called a 1:4 basket weave. The pattern overall looks like a woven basket. Additionally, for each paver that is oriented in one direction, there are four others oriented in the other direction. Furthermore, the 45 degree variation is also possible as well.
As you can see from the image above, placing your pavers at a 45° angle creates a variant of the 1:4 basket weave pattern that is not only appealing but offers increased visual depth.
2:4 Basket Weave Paver Pattern
The procedure used for creating the 2:4 basket weave pattern is very similar to the steps used for creating the 1:4 basket weave paver pattern. The only difference is instead of placing one paver with the short side facing you to start off, you place another one next to that one. Afterward, you place the next four pavers with the short sides against the long side of the previous one. After you r first six pavers are in place your sequence should resemble the example in the following image.
If you have decided to create your pattern starting at a corner of the area you are paving, you simply work across the area alternating the way the pavers face. Once you complete a row of pavers you begin the next row using an offset that places the 2 pavers facing one direction in the center of the four pavers in the row below facing the other direction. So, when you begin your second row of pavers, it will look like so.
Continuing the sequence across the second row and then repeating the process for the subsequent rows until the area is completely filled with pavers produces a pattern that resembles the one in the following image.
As you can see from the image above, the pattern is much like the 1:4 basket weave pattern in that it does in fact look like a woven basket. However, the one difference is the proportion of pavers facing in each direction is 2 to 4 instead of 1 to 4. Rotating the pavers 45 degrees yields the following pattern.
Like the rest of the patterns we have looked at, the 2:4 basket weave pattern can be enhanced by rotating it to change the perspective.
3:4 Basket Weave Paver Pattern
The 3:4 basket weave pattern used for pavers when creating driveways, patios, walkways and many other types of hard surfaces is one that is pretty straight forward to create. It is made using pavers that are all the same size. The dimensions of the pavers need to be precisely four times as long as they are wide.
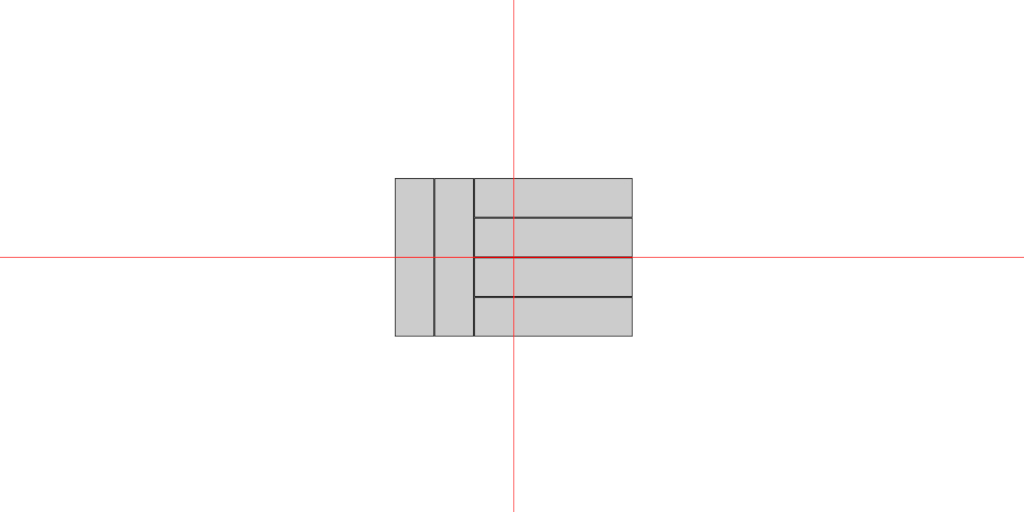
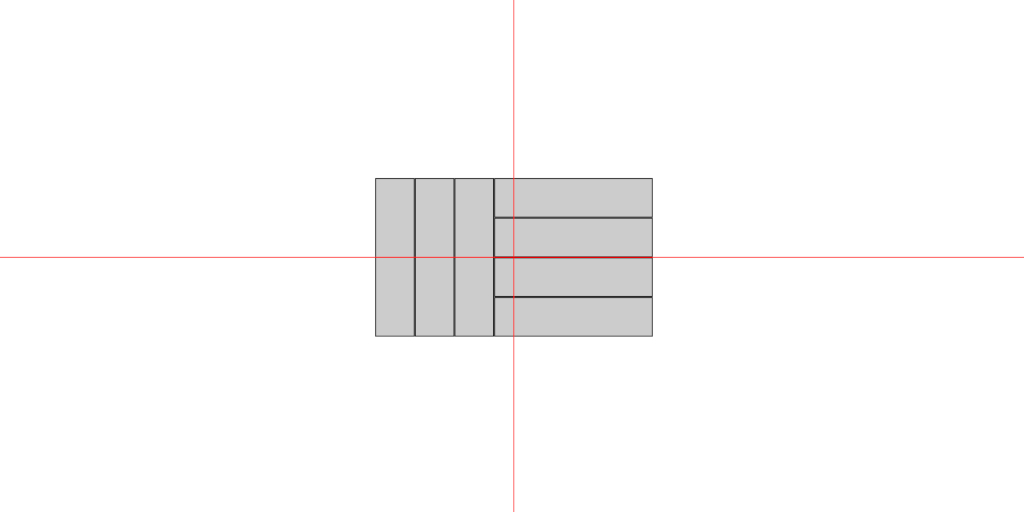
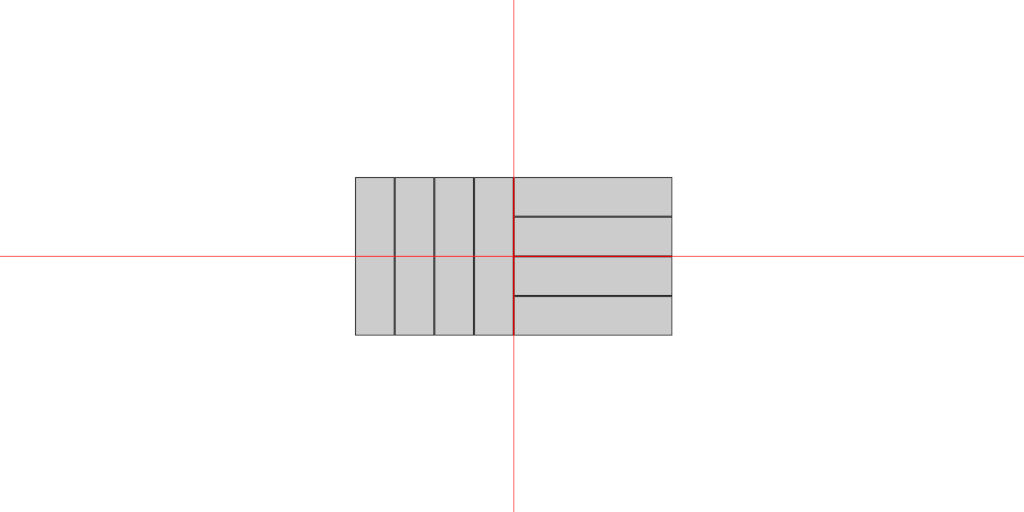
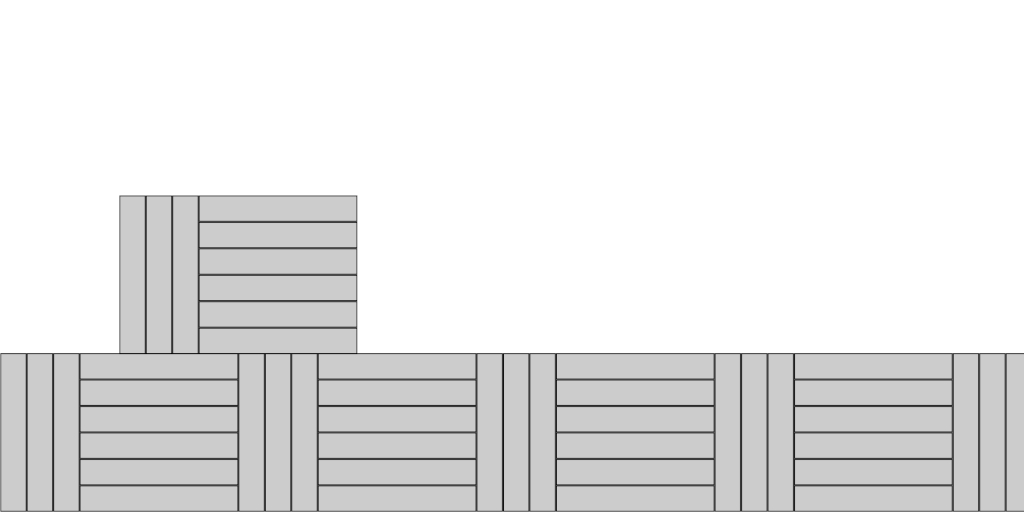
Begin the pattern by placing three pavers so that their short side is facing you and they are side-by-side. Then just next to those, place four pavers with their long side facing you one on top of another. You should now have a sequence of 7 pavers arranged like the ones in the following image.
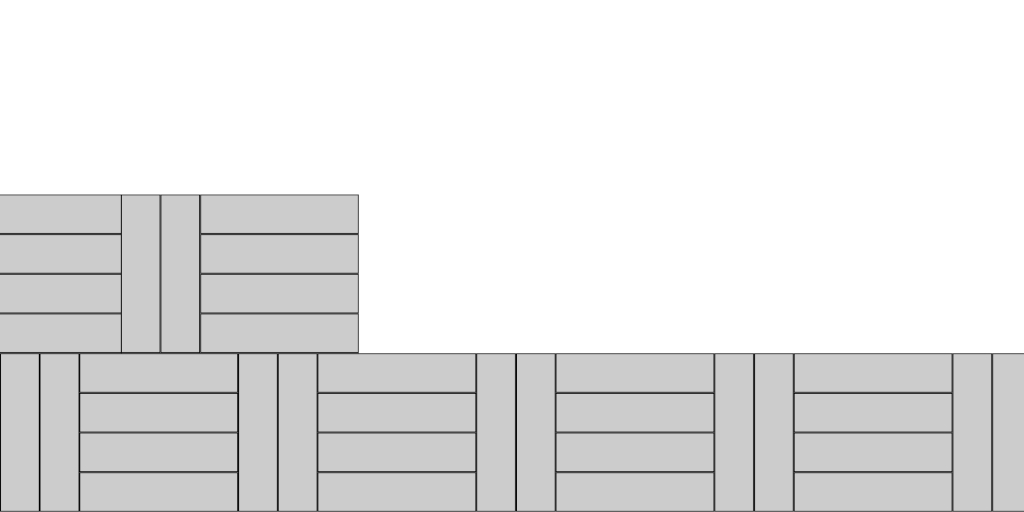
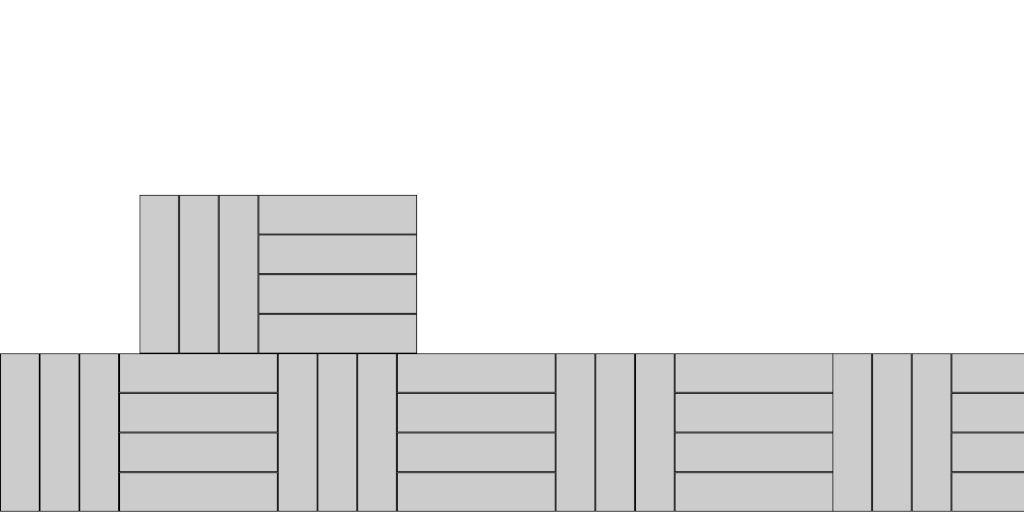
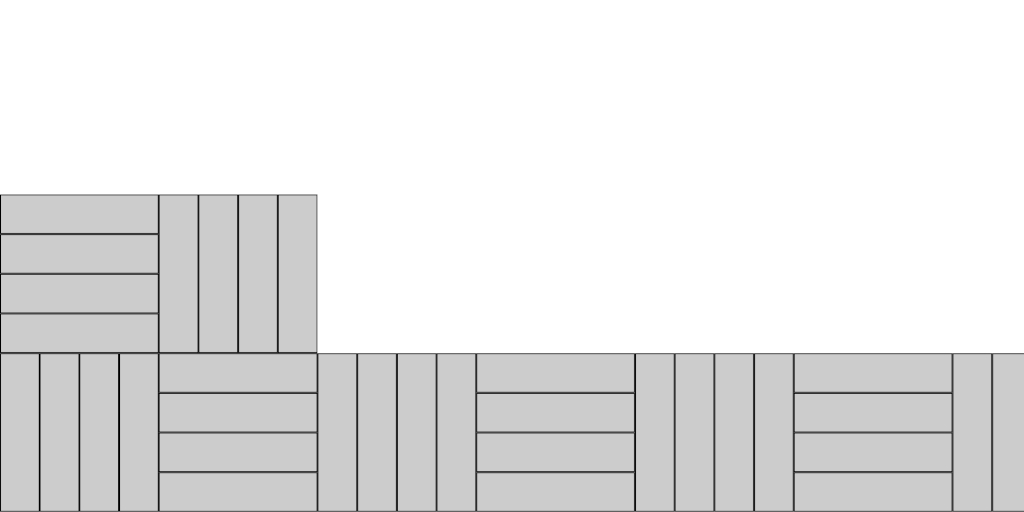
You can begin your pattern in the center of the area to be paved and work out from the center. But we will explain how to work from a corner and progress over and upward as you place pavers. If your seven starter pavers are in the left, lower corner of the are you are paving, continue placing pavers in the same configuration as you work from left to right. After you complete the first row of pavers, begin your second row of pavers using the same sequence, only offset the pavers so that your first three pavers are in the center of the four paver group from the row below. Your second row should begin like the next image shows.
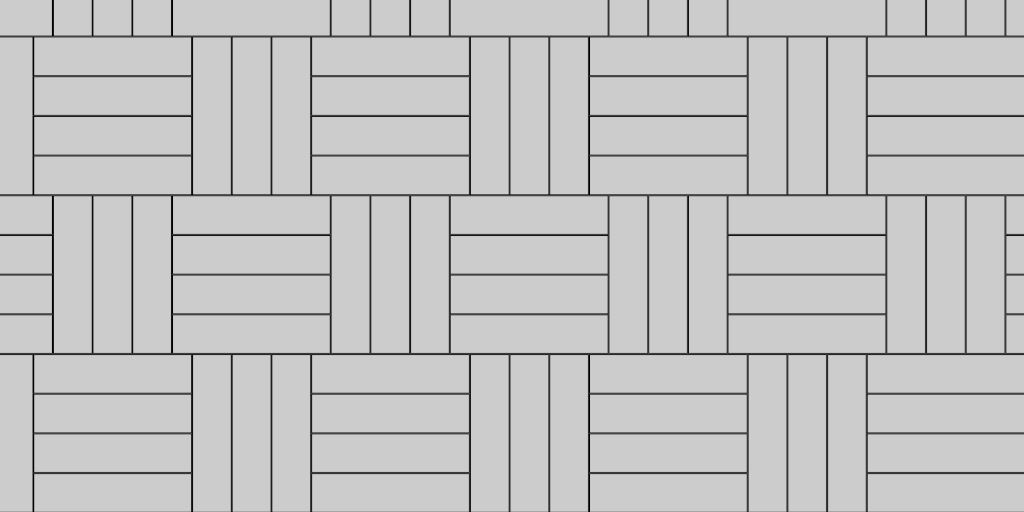
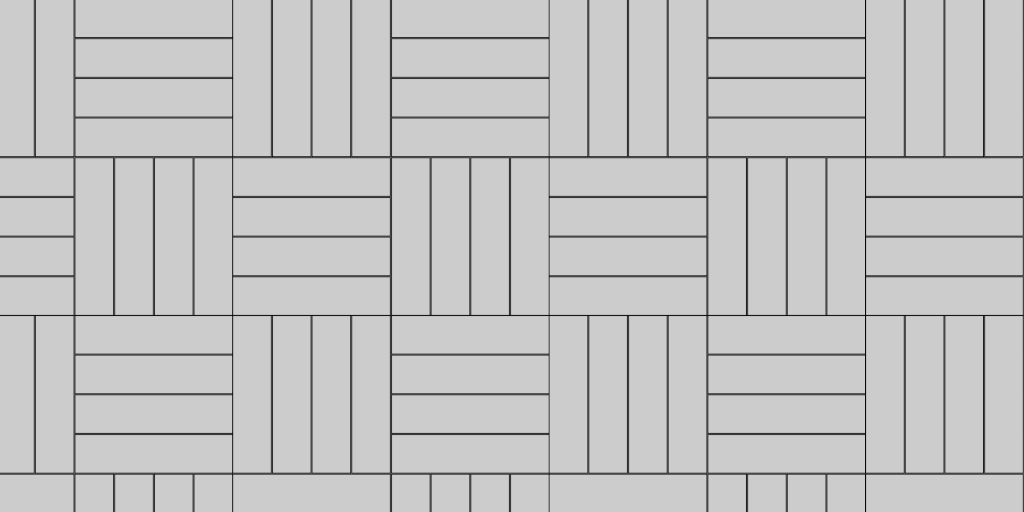
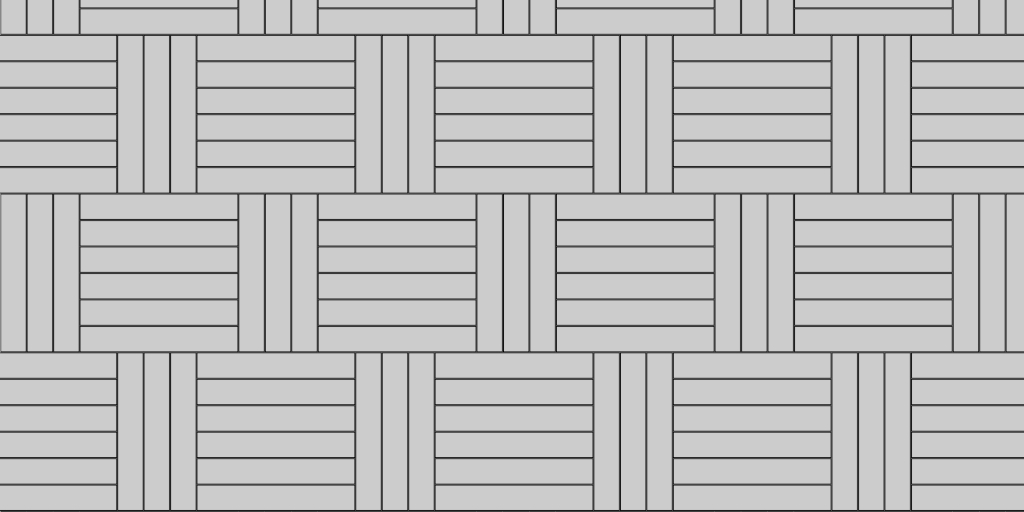
Continue placing pavers using the same 7 paver sequence and alternating your offset as you begin new rows. Keep in mind that you will most likely need to cut pavers so that the pavers on the ends of the rows will fit properly. When you have completed placing your pavers and the area is filled, you will have a completed 3:4 basket weave paver pattern that looks like the following image.
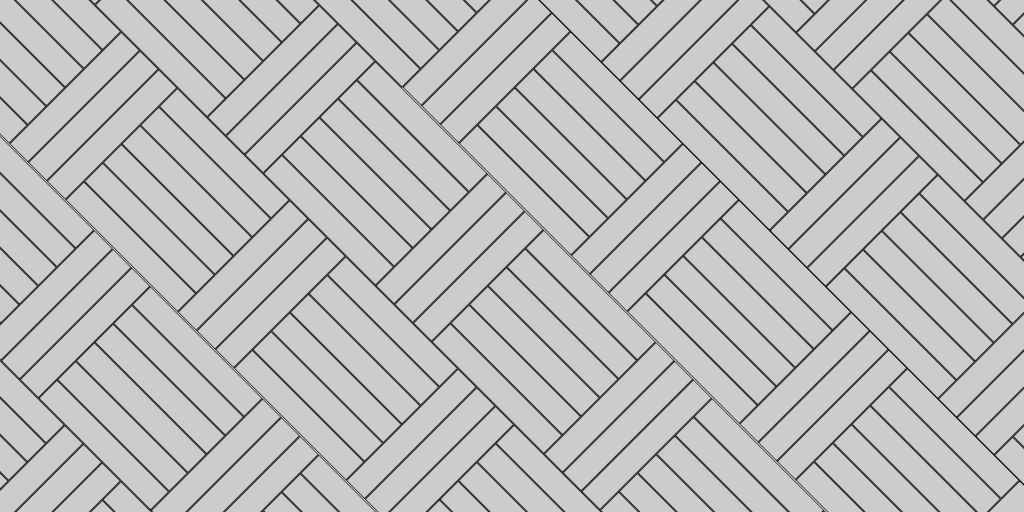
To create the 45 degree variation of the 3:4 basket weave paver pattern, you merely set your pavers the same way except you angle the work flow 45°. Doing this produces a pattern similar to the one in the following image.
Making use of the 3:4 basket weave pattern for your paver patios, driveways, and walkways can seem daunting at first, but once you get your first row or two in place, the rest of the pavers fall right into place relatively easily.
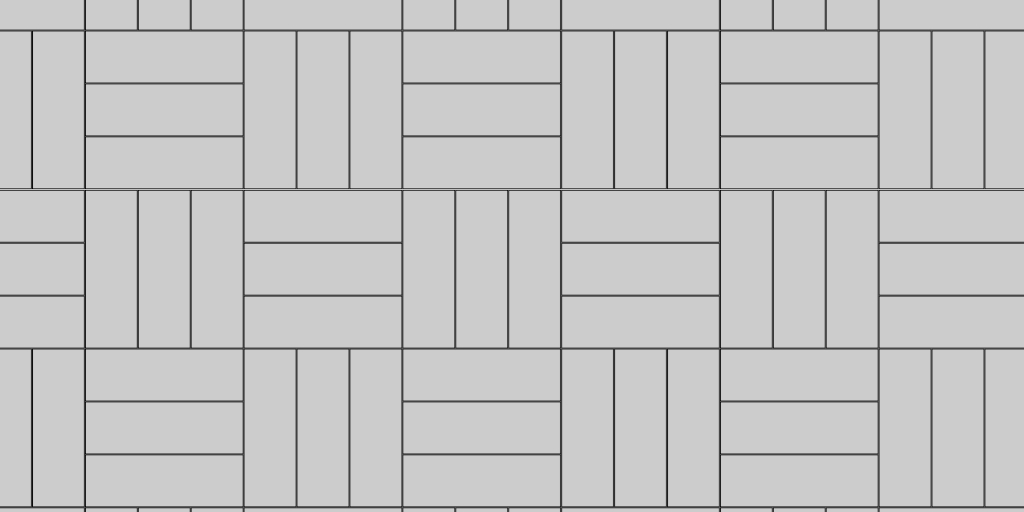
4:4 Basket Weave Paver Pattern
In the event that you are working on a paver walkway, driveway, or patio and you are working with one size paver that happens to be 4 times as long as it is wide. You might find that the 4:4 basket weave paver pattern is just what your project needs. If so, it is nice to know about the 4:4 basket weave pattern.
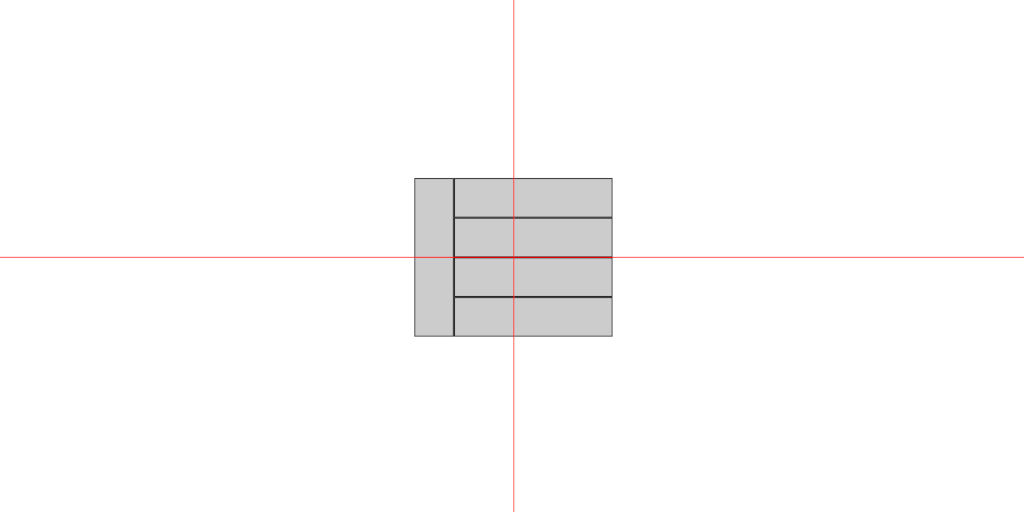
Beginning the 4:4 variation of the basket weave paver pattern is as simple as placing four pavers side-by-side with the short side of the paver facing you. Then next to those, place four pavers turned with the long side facing you, placing one paver above the other. Once you have done this, you should see eight pavers arranged in a pattern similar to the one shown in this image.
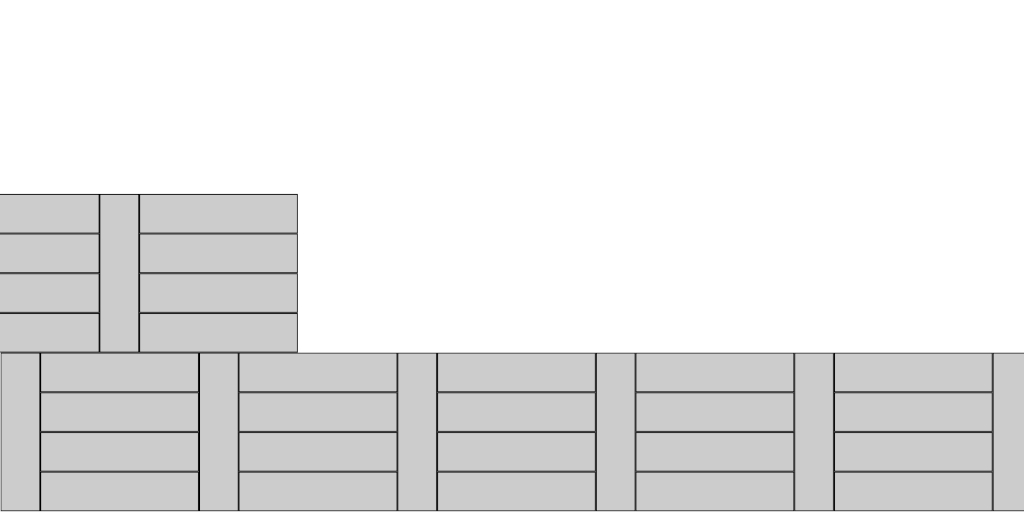
Now that you have the basic pattern, all you have to do is repeat this pattern for each row of pavers you place. When you begin a new row of pavers, turn the first four pavers so that they are oriented opposite their position on the first row. The second group of four will then be swapped as well. Here is a visual to demonstrate how the beginning of the second row will look.
Continue placing your pavers in groups of four working your way across each row and working your way through the rows, alternating the orientation of each row's pavers as you work. When you have filled in your entire area, the pattern should resemble the pattern as shown here.
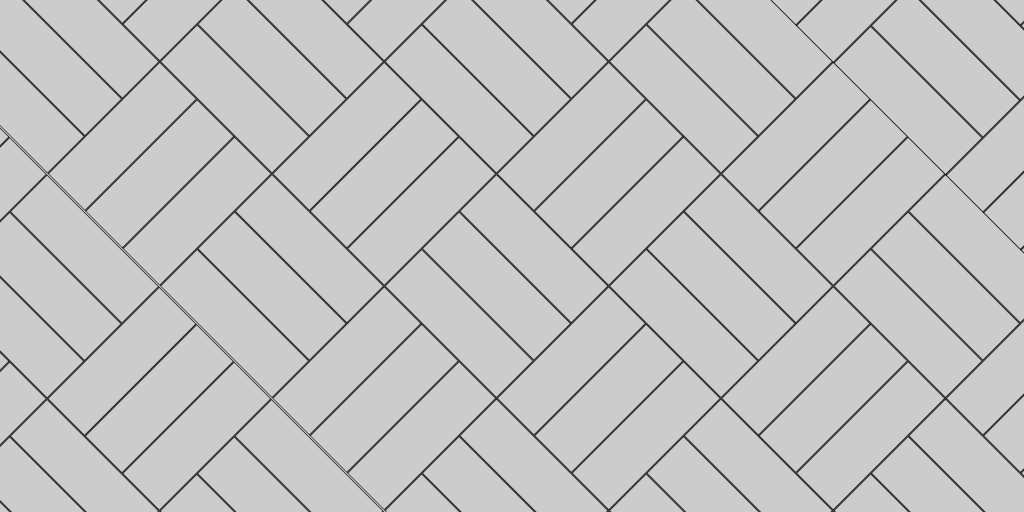
If you would prefer to have your paver project positioned so it offers a bit more depth and is a little enhanced, simply begin by placing your first paver at a 45 degree angle. You still place your additional pavers just as you did with the previous pattern. But the difference is that you are working at a 45° angle in relation to your area. When you have completed placing your pavers for this pattern, you should see something very much like this image.
The "by four basket weave" patterns are pretty easy to produce if you are familiar with laying pavers. All you need to do is follow the sequence for the variation that you are creating. And of course, these patterns only work if you are using pavers that have a length measuring four times their width.
1:6 Basket Weave Paver Pattern
Just as there are a number of variants of the "by four" basket weave paver patterns, there are a number of variations in the "by six" basket weave paver patterns. The first that we will take a brief look at is the 1:6 basket weave paver pattern.
The 1:6 basket weave paver pattern is designed to work with pavers that are six times as long as they are wide. Some of the sizing variations that would work for this paver pattern are:
3" x 18"
4" x 24"
This pattern is constructed by placing one paver with its short side facing you and then placing the next 6 pavers next to it with each of their short sides against the long side of the first paver. This results in a sequence of the first 7 pavers that look like the representation in the following image.
Now that you have the first group in place, simply repeat the same sequence to complete the first row. When you start the second row, be sure to offset the group of pavers so that the paver with its short side facing you is in the center of the group of 6 pavers on the first row. You will most likely need to cut some pavers to fill in the beginning of every second row as you work your way through the pattern. After you begin the second row, your progress should like something like the following image.
Now all there is to do is continue working your way through the pattern repeating the positioning of the first two rows in the pattern. After you have completed filling your area with pavers, you should have something similar to representation in the following image.
The 1:6 basket weave paver pattern is easy to adjust for visual interest. Simply begin your pattern by rotating your first paver 45° and working from there just as you would if you were creating the standard 1:6 basket weave pattern mentioned above. Your completed 45° 1:6 paver pattern should resemble this image.
So the 1:6 basket weave paver pattern is relatively easy to construct and only requires one size of paver. Yet, the paver it requires does need to have a width that is ⅙ of the length of the paver.
2:6 Basket Weave Paver Pattern
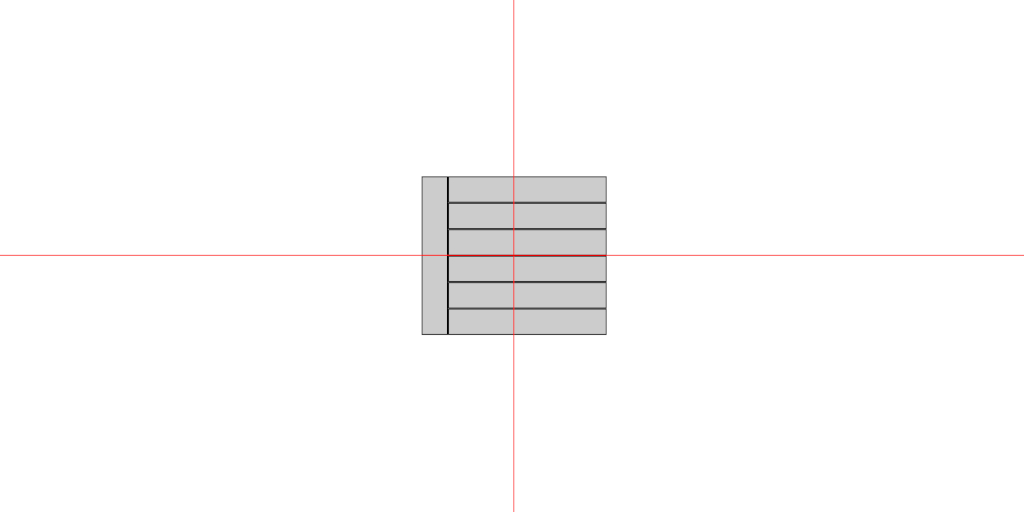
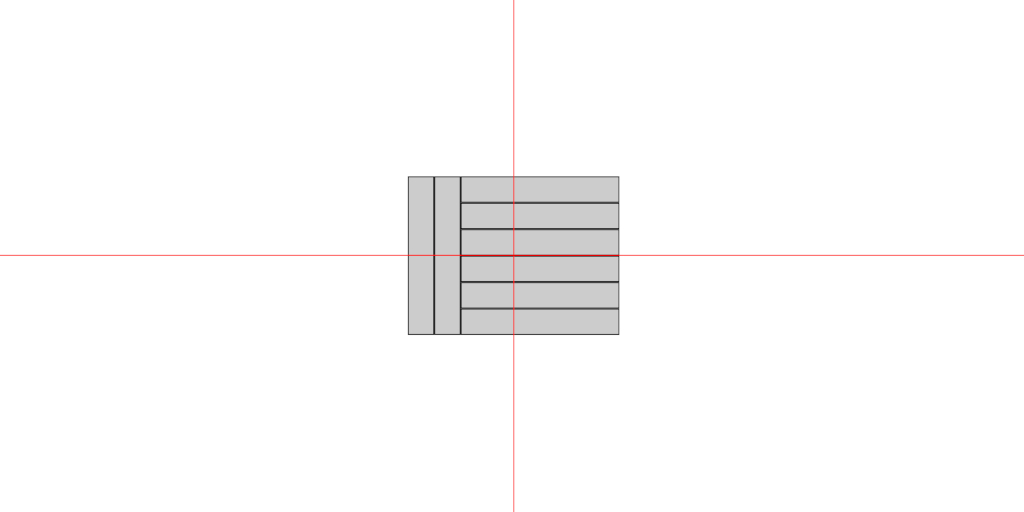
This pattern is constructed by placing two pavers with the short side facing you and then placing the next 6 pavers next to those with each of their short sides against the long side of the paver to their left. This results in a sequence of the first 8 pavers that look like the representation in the following image.
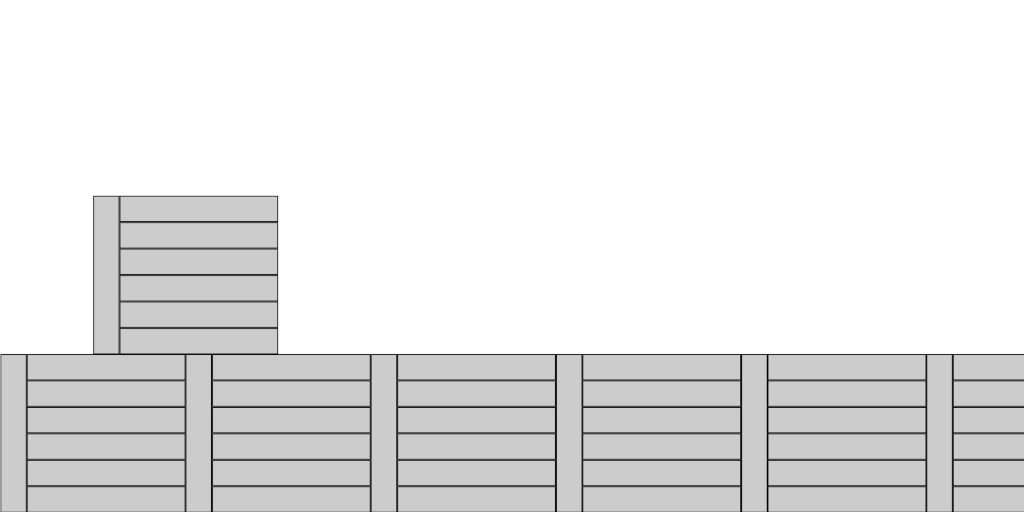
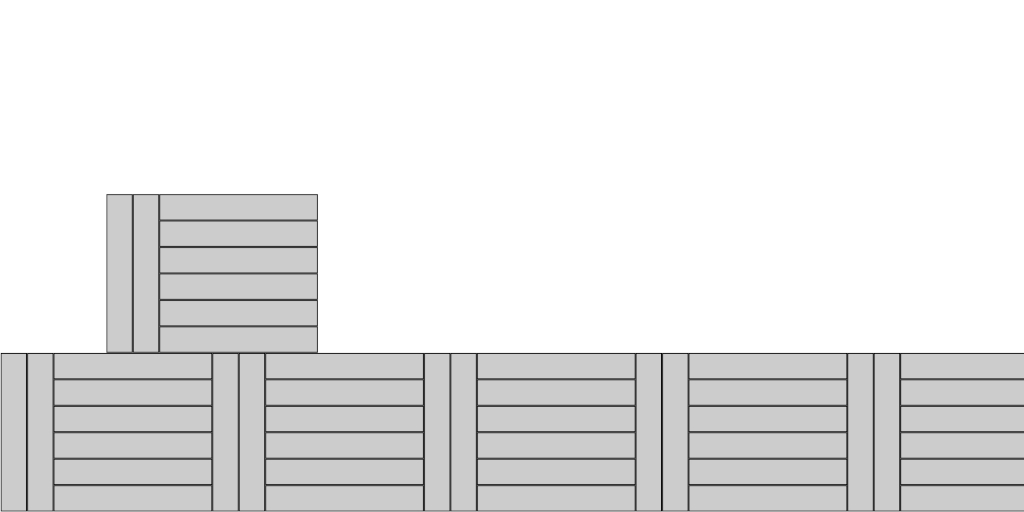
Now that you have the first group of 8 pavers in place, simply repeat the same sequence to complete the first row. When you start the second row, be sure to offset the group of pavers so that the 2 pavers with their short side facing you is in the center of the group of 6 pavers on the first row. You will most likely need to cut some pavers to fill in the beginning of every second row as you work your way through the pattern. After you begin the second row, your progress should like something like the following image.
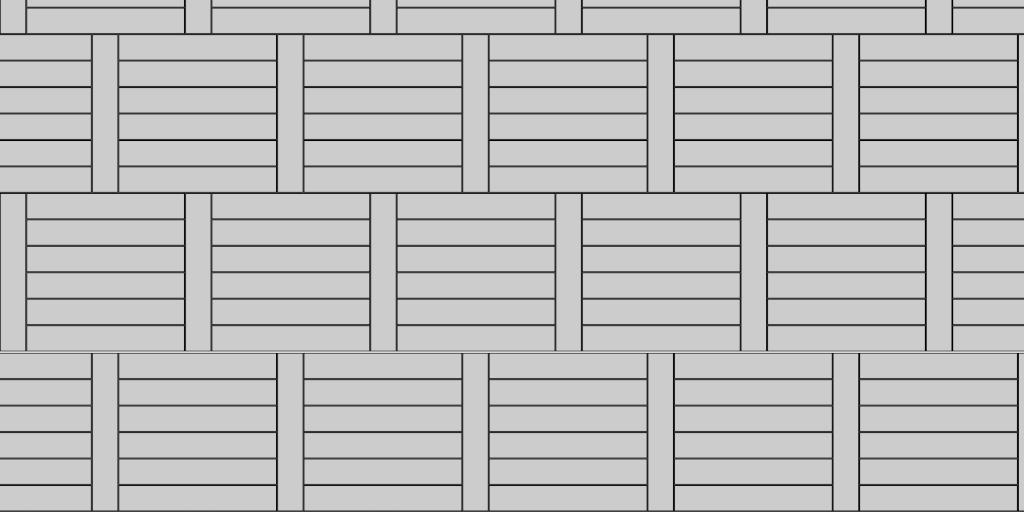
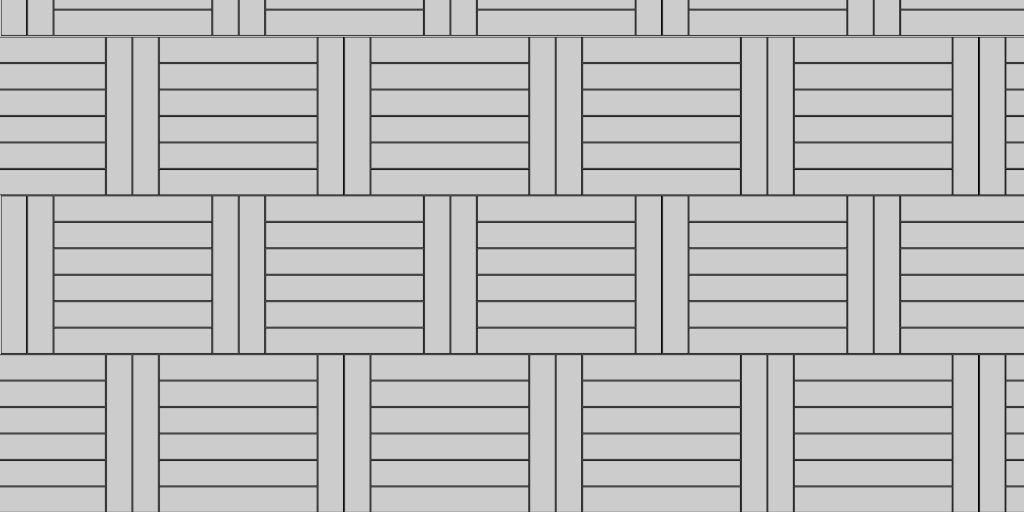
Now all there is to do is continue working your way through the pattern repeating the positioning of the first two rows in the pattern. After you have completed filling your area with pavers, you should have something similar to representation in the following image.
The 2:6 basket weave paver pattern is easy to adjust for visual interest. Simply begin your pattern by rotating your first paver 45° and working from there just as you would if you were creating the standard 2:6 basket weave pattern mentioned above. Your completed 45° 2:6 paver pattern should resemble this image.
So the 2:6 basket weave paver pattern is relatively easy to construct and only requires one size of paver. Yet, the paver it requires does need to have a width that is ⅙ of the length of the paver.
3:6 Basket Weave Paver Pattern
This pattern is constructed by placing two pavers with the short side facing you and then placing the next 6 pavers next to those with each of their short sides against the long side of the paver to their left. This results in a sequence of the first 8 pavers that look like the representation in the following image.
Now that you have the first group of 9 pavers in place, simply repeat the same sequence to complete the first row. When you start the second row, be sure to offset the group of pavers so that the 3 pavers with their short side facing you is in the center of the group of 6 pavers on the first row. You will most likely need to cut some pavers to fill in the beginning of every second row as you work your way through the pattern. After you begin the second row, your progress should like something like the following image.
Now all there is to do is continue working your way through the pattern repeating the positioning of the first two rows in the pattern. After you have completed filling your area with pavers, you should have something similar to representation in the following image.
The 3:6 basket weave paver pattern is easy to adjust for visual interest. Simply begin your pattern by rotating your first paver 45° and working from there just as you would if you were creating the standard 3:6 basket weave pattern mentioned above. Your completed 45° 3:6 paver pattern should resemble this image.
So the 3:6 basket weave paver pattern is relatively easy to construct and only requires one size of paver. Yet, the paver it requires does need to have a width that is ⅙ of the length of the paver.
There are other variations of the basket weave pattern pattern that can be created using specific paver sizes. But you get the idea from this article what can be accomplished. So for your next paver project, why not consider one of the many visually interesting basket weave patterns? There are many from which to choose!